Pullip MIO: 8 Step Assemble Tutorial

by - October 06, 2014

【 Spanish/Español : Aquí

Koori KooriStyle Kawaii BJD Pullip Doll PullipDoll Assemble Tutorial Cute MIO Make-It-Own PullipMIO HowTo

Hi! Today I’ll make a tutorial about how to assemble your Pullip MIO doll. I’ll try to keep it simple by showing most of the steps with pictures. Let’s start ★!

Koori KooriStyle Kawaii BJD Pullip Doll PullipDoll Assemble Tutorial Cute MIO Make-It-Own PullipMIO HowTo Koori KooriStyle Kawaii BJD Pullip Doll PullipDoll Assemble Tutorial Cute MIO Make-It-Own PullipMIO HowTo
1) First let’s assemble the eyes! The MIO eyelashes are a little bit simple; so if you want them to have more impact you can buy a pair of eyelashes (I bought mines for less than $1) and just cut one of them in half to make two Pullip eyelashes. Then with a toothpick add some liquid glue in the area for the eyelashes at the back of the eyelid, as you can see in the next pictures:

Koori KooriStyle Kawaii BJD Pullip Doll PullipDoll Assemble Tutorial Cute MIO Make-It-Own PullipMIO HowTo Koori KooriStyle Kawaii BJD Pullip Doll PullipDoll Assemble Tutorial Cute MIO Make-It-Own PullipMIO HowTo
2) The blue area is for the eyelashes. Try not to add glue outside this area and also try to keep the eyelashes the size of this area width (If the eyelashes width is larger, when the eyes are closed the eyelashes will have a weird shape at the corners). Using another toothpick you can center and adjust the eyelash into its place.

Koori KooriStyle Kawaii BJD Pullip Doll PullipDoll Assemble Tutorial Cute MIO Make-It-Own PullipMIO HowTo Koori KooriStyle Kawaii BJD Pullip Doll PullipDoll Assemble Tutorial Cute MIO Make-It-Own PullipMIO HowTo
3) Once we have glued both of the eyelashes we’ll be ready to put them into place inside the head’s front piece as shown in the picture above.

Koori KooriStyle Kawaii BJD Pullip Doll PullipDoll Assemble Tutorial Cute MIO Make-It-Own PullipMIO HowTo Koori KooriStyle Kawaii BJD Pullip Doll PullipDoll Assemble Tutorial Cute MIO Make-It-Own PullipMIO HowTo
4) Moving on with the eyes; the eye-chips that we receive doesn’t have any color. For this tutorial I’ll use some purple eye-chips I bought. To attach the eye-chip we’ll use once again a toothpick with glue, adding the glue in the area I show in blue. Then we’ll place the eye-chip and let it dry a little bit. (Soon I’ll make a tutorial about how to add color into the eye-chips).

Koori KooriStyle Kawaii BJD Pullip Doll PullipDoll Assemble Tutorial Cute MIO Make-It-Own PullipMIO HowTo Koori KooriStyle Kawaii BJD Pullip Doll PullipDoll Assemble Tutorial Cute MIO Make-It-Own PullipMIO HowTo
5) Once the eyes are glued into the eyes mechanism we have to be sure to align the top and bottom as shown in the picture above. Then we’ll place the eyes mechanism; I used some pink post-it’s to show you where the eye mechanism must align inside the head.

Koori KooriStyle Kawaii BJD Pullip Doll PullipDoll Assemble Tutorial Cute MIO Make-It-Own PullipMIO HowTo Koori KooriStyle Kawaii BJD Pullip Doll PullipDoll Assemble Tutorial Cute MIO Make-It-Own PullipMIO HowTo
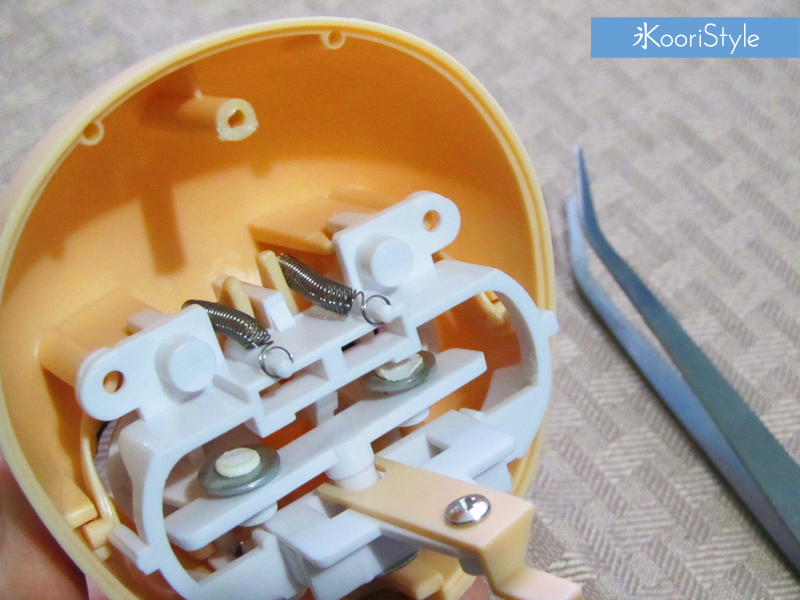
6) Now using some tweezers we’ll grab the eyelids spring and place the loop in the small bar that comes in the eyes mechanism as shown in the second picture above.

Koori KooriStyle Kawaii BJD Pullip Doll PullipDoll Assemble Tutorial Cute MIO Make-It-Own PullipMIO HowTo Koori KooriStyle Kawaii BJD Pullip Doll PullipDoll Assemble Tutorial Cute MIO Make-It-Own PullipMIO HowTo
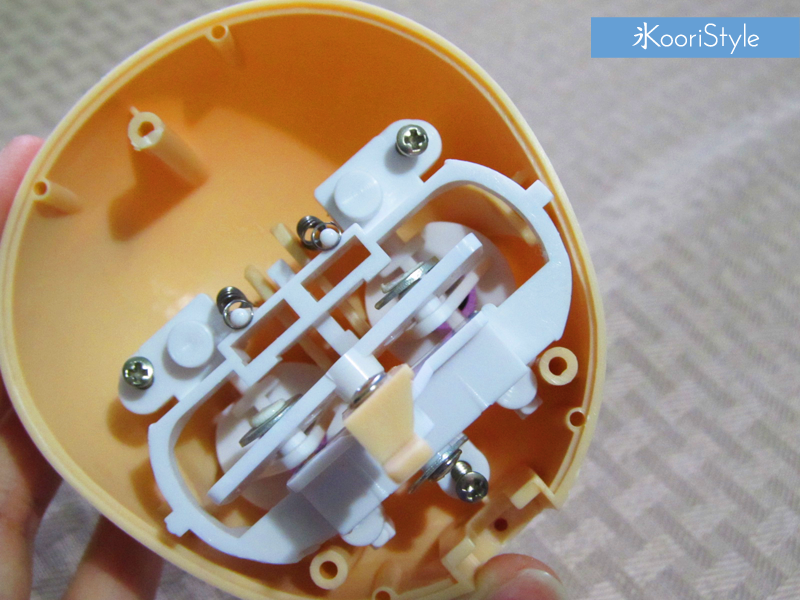
7) We’re almost there! The next step is to secure the eye mechanism with the 3 small screws. Check twice the size because if you try to use a larger screw it won’t fit and you’ll have trouble closing the doll. In the second picture above I show, with another pair of pink post-it’s, the area where you need to place the wink bars (there’s a left and right wink bar).

Koori KooriStyle Kawaii BJD Pullip Doll PullipDoll Assemble Tutorial Cute MIO Make-It-Own PullipMIO HowTo Koori KooriStyle Kawaii BJD Pullip Doll PullipDoll Assemble Tutorial Cute MIO Make-It-Own PullipMIO HowTo
8) Now grab the Pullip body and place the neck inside the head. Push it carefully until the end and then place the back head piece into its place, closing it with the 3 large screws. Once it’s done check the movement of the eyes from left to right; also open and close them.

Koori KooriStyle Kawaii BJD Pullip Doll PullipDoll Assemble Tutorial Cute MIO Make-It-Own PullipMIO HowTo

And you’re done! Simple, isn’t it? This tutorial only shows the assemble process, in the upcoming weeks I’ll make some make-up tutorials. Look forward them ;)

What have you been doing lately? I’ve been sewing a lot! Have a lovely day and I'll see you soon ♥.


:: ESPAÑOL ::
¡Hola! Hoy haré un tutorial sobre cómo armar su muñeca Pullip MIO :D *Ver imágenes arriba*

1) Primero vamos armar los ojos. Las pestañas que vienen en la caja son muy simples; así que si desean que tengan más impacto pueden comprar un par de pestañas y cortar una de ellas a la mitad para crear dos pestañas para Pullip. Después, con un palillo de dientes añadiremos un poco de pegamento líquido en la zona de las pestañas, en la parte posterior del párpado.

2) La zona de las pestañas está marcada con azul en mi imagen. Traten de no añadir pegamento fuera de esta zona y también intenten mantener las pestañas del tamaño del ancho de esta zona ya que si el ancho de las pestañas es más grande, cuando los ojos se cierren, las pestañas tendrán una forma extraña en las esquinas. Pueden usar otro palillo de dientes para centrar y ajustar las pestañas en su lugar.

3) Una vez que hemos pegado las dos pestañas las pondremos en su lugar dentro de la pieza delantera de la cabeza como se muestra en las imágenes.

4) Continuando con los ojos, los eye-chips que recibimos son transparentes, así que para este tutorial voy a utilizar unos eye-chips morados que compré. Para colocar el eye-chip usaremos de nuevo el palillo con pegamento, agregaremos pegamento en todo el contorno y, tras colocar los eye-chips, dejaremos que se seque un poco. (Pronto haré un tutorial sobre cómo pintar los eye-chips).

5) Una vez que los ojos están bien adheridos tenemos que asegurarnos de alinear la parte superior e inferior del mecanismo de los ojos como se muestra en las imágenes de arriba. Después colocamos este mecanismo dentro de la cabeza.

6) Ahora, utilizando unas pinzas, sujetaremos el pequeño resorte que viene en los párpados y colocaremos la punta alrededor de la pequeña barra que viene en el mecanismo de los ojos.

7) ¡Ya casi terminamos! El siguiente paso es fijar el mecanismo de los ojos con los 3 tornillos pequeños. Revisa bien el tamaño porque si tratamos de usar un tornillo grande este no encajará bien y tendrás problemas para cerrar la muñeca. Una vez hecho esto, pondremos las barras para guiño en su lugar (hay una izquierda y una derecha).

8) Ahora tomaremos el cuerpo de la Pullip y colocaremos el cuello dentro de la cabeza. Empújenlo con cuidado hasta el final y después coloquen la pieza de la cabeza trasera en su lugar para cerrarla con los 3 tornillos grandes. Antes de finalizar comprueben el movimiento de los ojos de izquierda a derecha, y abriéndolos y cerrándolos.

¡Y terminamos! Simple ¿no es así?. Este tutorial sólo muestra el proceso de armado, en las próximas semanas haré algunos tutoriales de maquillaje, así que estén al pendiente ;)

¿Qué han estado haciendo últimamente? Yo he estado cosiendo mucho~ Tengan un lindo día y nos vemos pronto ♥.

0 Comments